Year 10 Electronics

Project 1 - Light
|
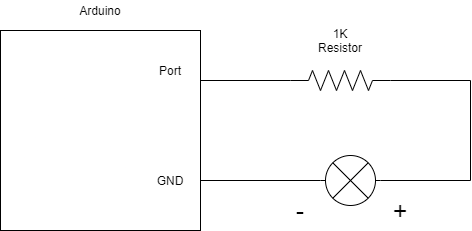
For this project you will need:
1x Light Bulb 2x Wires (any colour) 1x 1K resistor 1x Bread Board 1x Arduino 1x USB Cable Task: Make the light turn on Look at this diagram and try to complete the circuit. 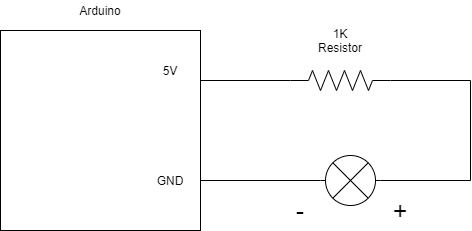
|
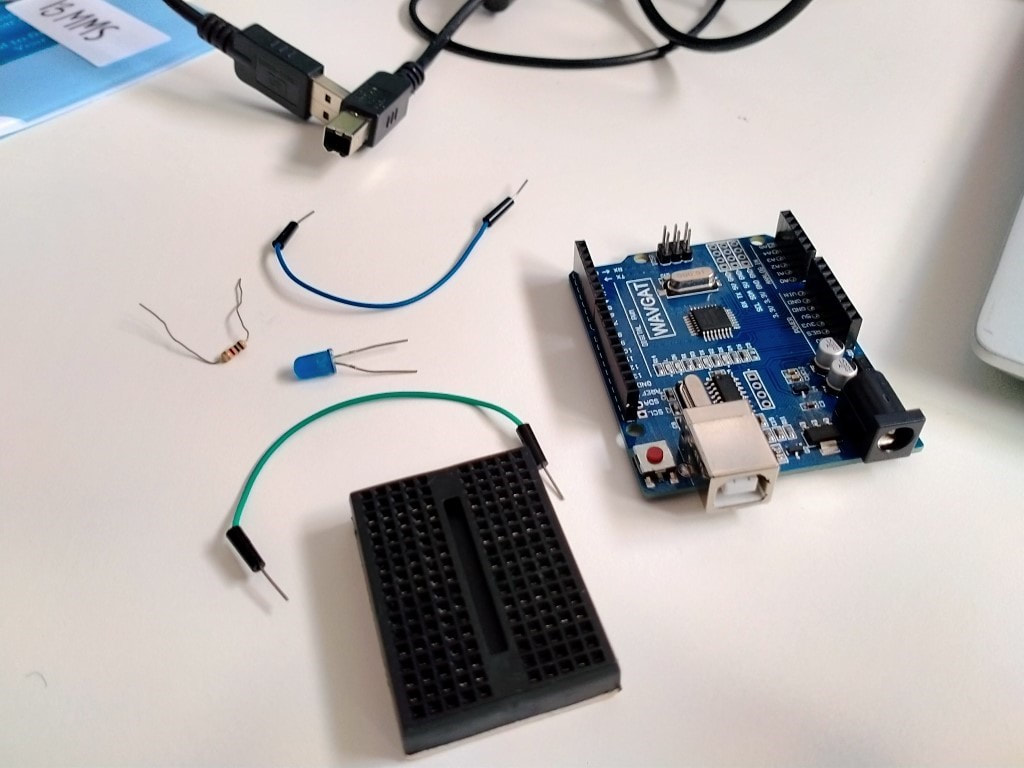
Hint: It should look like the picture below when done

|
Project 2 - Blinking Light
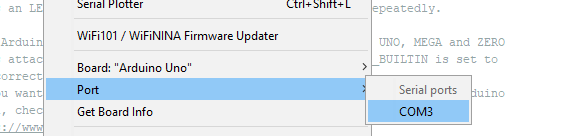
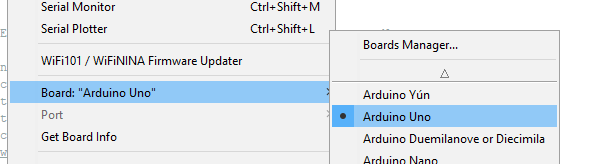
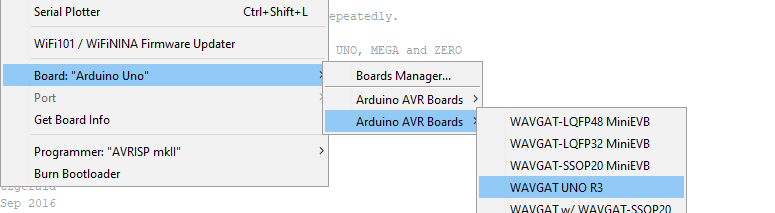
Setting up your ArduinoUFollow these steps to setup your arduino
1.) Plug your arduino into your computer 2.) Open the arduino app on your desktop 3.) change the port number to anything but port 1 4.) Change the arduino to either: a.) arduino Uno or b.) Wavgat Uno R3 (if it says Wavgat on your board) Testing your Arduino
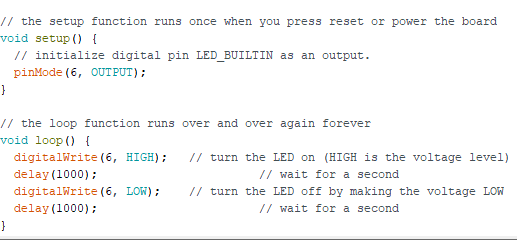
1.) Click File --> Examples --> 01.Basics --> Blink
2.) Click Upload If it is successful then a light on your ardunio should start blinking 
|
Programming your light to blink1.) Configure your board as per this diagram:
Digital PWN is a number on the side from 0-12, pick one :-)
2.) Wherever the code says LED_BUILTIN change it to the number you have plugged the wires into. <---------------------- Adjust the Delay to see what happens :-) (do this 3 different times) |
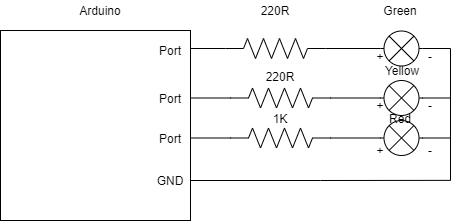
Project 2 - The traffic Light

Setting up your Traffic LightsYou will need:
7 Wires (2 Red, Yellow, Green preferably) 3 Bulbs (Red, Yellow, Green) Arduino USB Cable Bread Board Follow the diagram on the right to plug it in, or look at the picture above. Hint: you can plug one slot into GND and they all become ground ProgrammingOpen the Blink program from the last activity.
Copy the entries for the number of lights you are using in both Void setup and Void loop Hint: Keep everything inside the { } |
Using ConstantsAt very the top of your code write:
const int green = 5; const int yellow = 6; const int red = 7; You can now use the word green instead of the number 5, it is easier to remember ports this way. 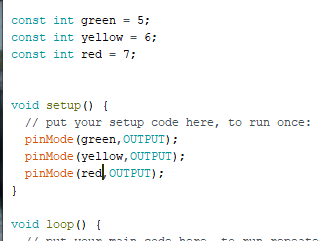
|
Project 3 - Continuous Servo Motor

Setting up the ServoYou will Need:
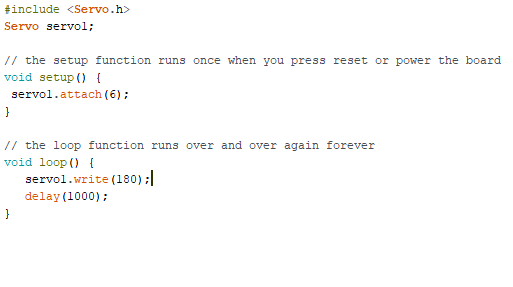
1x Continuous Servo Motor 3x Wires 1x Arduino 1.) Gather the above components 2.) Plug the motor in as per the diagram on your right Hint; Red +, goes to power, try to figure out the others. Program the MotorCopy the code from the picture on your Right
Keep in mind it is case sensitive, so you will need to capitalize a letter. Main Task: Rotate 3 times forwards then 3 times backwards then stop for 2 secondsModifying the delays and digital writes, get the motor to:
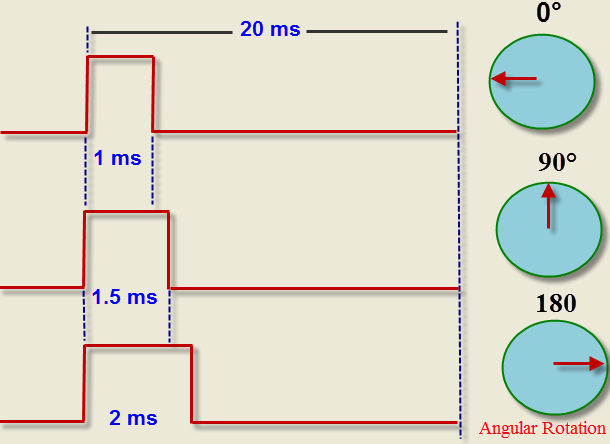
- Rotate 3 times forwards - Rotate 3 times backwards - Stop for 2 seconds Hint: As per the picture on the right - 180 is full speed forward, 90 is stop, 0 is full speed reverse. |

|
Project 4 - Ultra Sonic Sensor

Setup ArduinoYou will need:
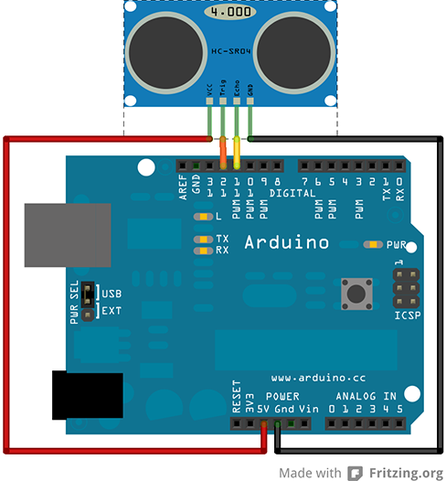
1x Ultra Sonic Sensor 4x Wires 1x Bread Board Using the diagram on the right and the picture above plug in the ultra sonic sensor. Keep a note of which numbers you plug the Trig and Echo into. Trig = Output Echo = Input 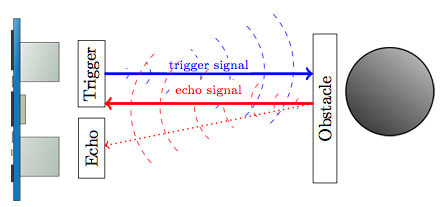
Programming the UltraSonic SensorCopy and paste in the code on the right
Change the numbers of output and input to match the ports you used. 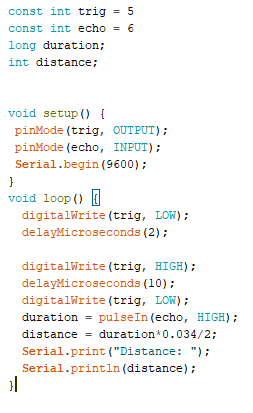
Testing the Sensor
Click the "Serial Monitor Button" on the top right
If working it should change the measurement as per the picture on the right |
const int trig = 5
const int echo = 6 long duration; int distance; void setup() { pinMode(trig, OUTPUT); pinMode(echo, INPUT); Serial.begin(9600); } void loop() { digitalWrite(trig, LOW); delayMicroseconds(2); digitalWrite(trig, HIGH); delayMicroseconds(10); digitalWrite(trig, LOW); duration = pulseIn(echo, HIGH); distance = duration*0.034/2; Serial.print("Distance: "); Serial.println(distance); } 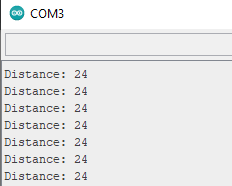
|
Main Task: Lights and Sensors
|
Now the Additional Tasks
1. Plug a bulb in and make it so it lights up if the sensor is under 10cm 2.Plug another bulb in and make it so it lights up if the sensor is under 30cm Hint: Both bulbs should light up if under 10cm |
if ( distance < 10){
} else { } |
Project 5 - The Light Switch

Setting up your ArduinoYou will need the following:
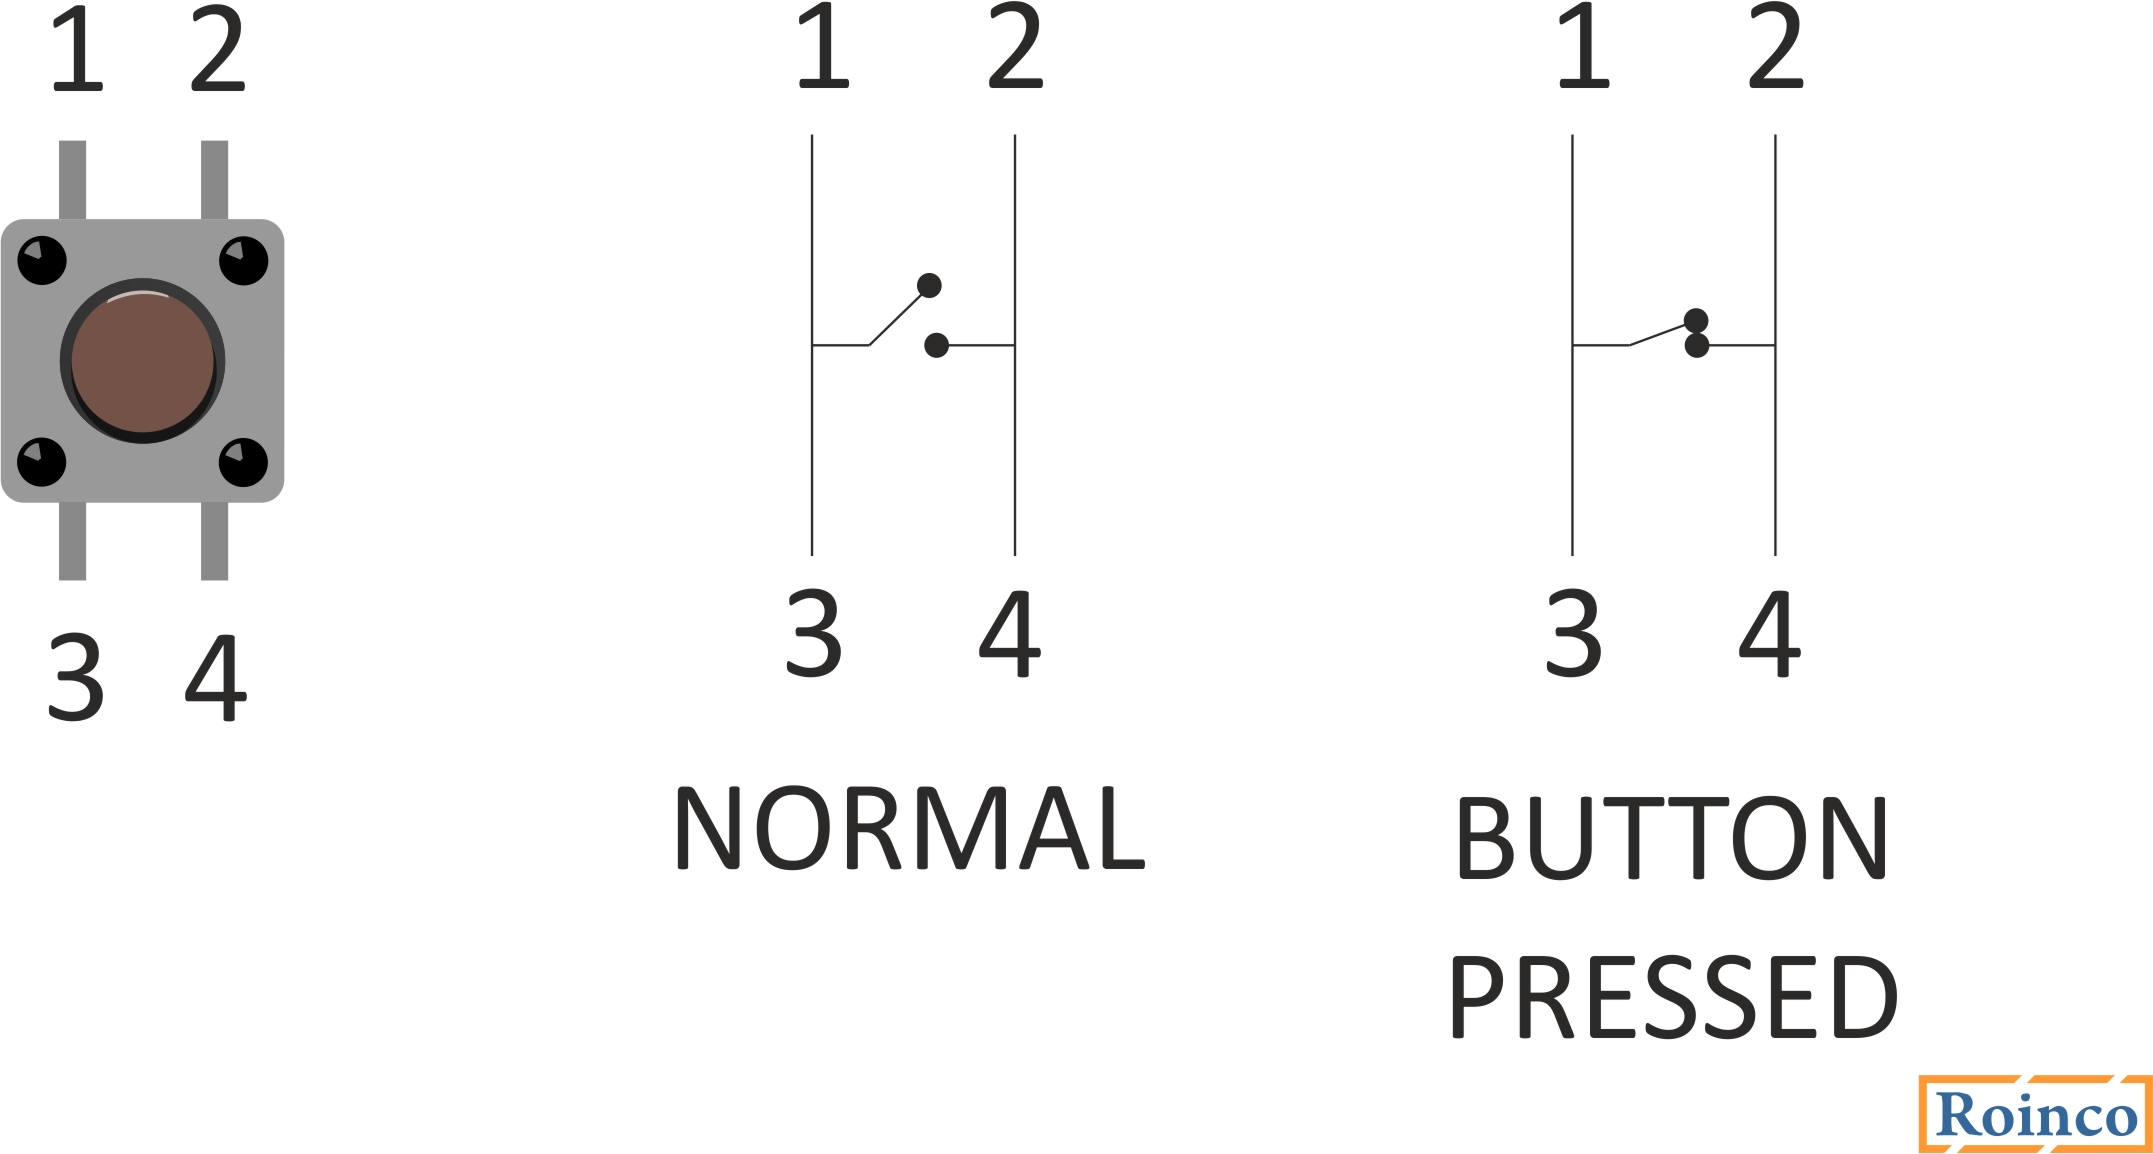
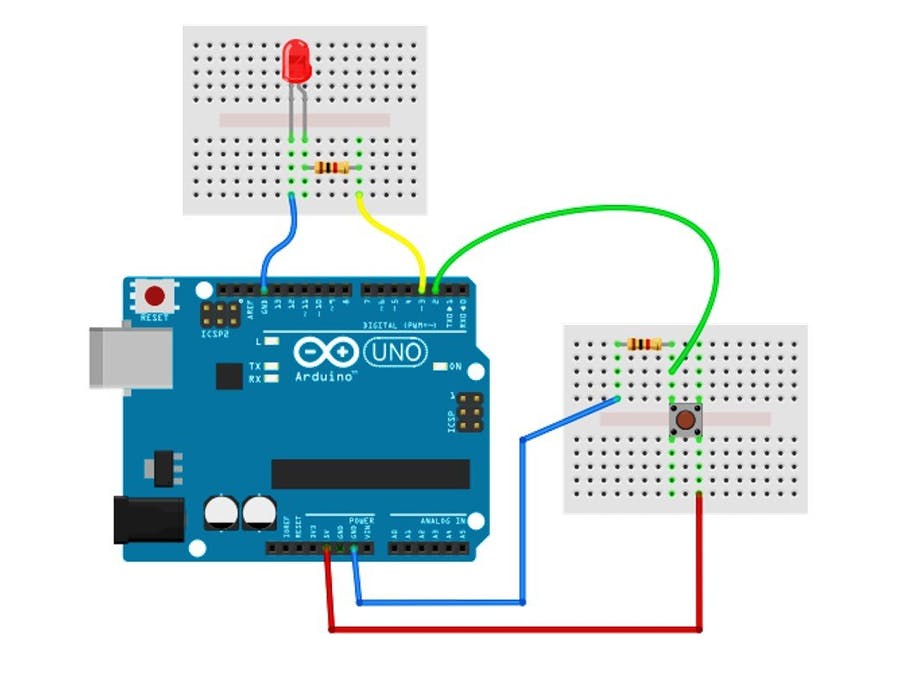
1x Arduino 1x Breadboard 1x Button 1x LED (your Choice) 2x Resistors(1k Resistor and the other to match the LED) Wires (at least 5) Setting up the buttonUse the picture Diagram on the right to set it up...
However try to only use one bread board. Consider the switch diagram up the top to understand how buttons work. Programming the ButtonCopy this code:
const int BUTTON = 2; int BUTTONstate = 0; void setup () { pinMode(BUTTON, INPUT); Serial.begin(9600); } void loop() { BUTTONstate = digitalRead(BUTTON); if (BUTTONstate == HIGH) { Serial.println("on"); } else { Serial.println("off"); } } First Task: Programming the LightMake it so that the light turns on when the button is pushed down.
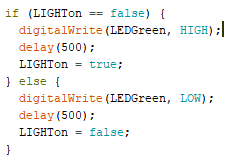
Second Task: Make the Light turn on and of by simply touching itYou need to modify your code so that you can simply press your button once and it will turn on, and then press it again and it will turn off.
Look at the code on the right for an example of the modified code. Tips: 1.) You will need to figure out where to put the code. 2.) You will need to remove the else from the previous coding |
Testing the buttonClick the serial monitor button below:
See what happens when you press the button 


|
Extra for Experts Task
For those super experts out there
If you hold down the light switch it turns off and on
Try to make it so the light only changes once you release the button
If you hold down the light switch it turns off and on
Try to make it so the light only changes once you release the button
